 Winter is a perfect opportunity to have some chilly science fun! The frosty weather provides several unique chances to discover the principles of chemistry through hands-on activities. Here is one idea to add some winter science fun into your homeschool!
How to make Snowflakes Crystals
In this experiment, the students will learn about crystallization. You will need:
- String
- A wide mouthed jar
- Pencil
- Pipe cleaners
- Water
- Borax
- Scissors
Note: You can find Borax in the laundry aisle of the local grocery store. Be sure to buy the one labeled laundry booster, not the soap that includes Borax.
Steps to Complete
- Begin by using your pipe cleaners to make a snow flake shape. This can be as simple or as complex as you wish, but make sure it will fit through the opening of your jar.
- Tie a string to your snowflake and then tie the other end of the string to a pencil. You want the pencil to be able to rest on the edge of your jar without having your snowflake touch the sides or bottom of the jar.
- Add boiling water until is almost fills the jar, noting how many cups of water it takes to fill the jar.
- Then add the Borax one tablespoon at a time. Taking care each time to stir until the Borax is dissolved. You want to add about 3 tablespoons of Borax for every cup of water you have added.
- Hang your snowflake in the jar so that it is completely covered by the liquid.
- Allow the jar to sit undisturbed overnight.
- In the morning, take out your snowflake and admire your beautiful crystals.
Results
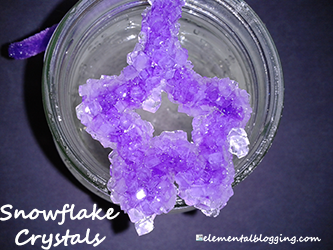
You should see that your pipe cleaners are completely coated with crystals. The crystals should be white, making your pipe cleaner snowflake look like ice or snow.
Explanation
Hot water can hold more Borax crystals than cold water. This is because the hot water molecules are further apart making more room in which the Borax crystals can dissolve. In this way, you were able to super saturate the water with Borax crystals. As the water cooled the molecules came closer together, causing the Borax crystals to come out of solution and form crystals again. The pipe cleaners give the crystals an easy place to attach and begin to form, which is why they are coated with the crystals.
Taking it Further
If you are lucky enough to have a snowy day and a microscope, take some time to explore real snowflakes crystals. Place several slides in the refrigerator to chill them so that the snow won’t immediately melt. Then head out side and collect a few snowflakes on your slide. Look at them immediately under low and high power. You need to do this quickly as the light source from the microscope will melt the flakes. You can also use a magnifying glass for this, but you won’t be able to see nearly as much detail.
How about you, do you do anything special for science in the winter?


Thanks for sharing ideas for us to explore. We did the borax crystals the Christmas before last. Lovely ornaments! We twisted red and white pipe cleaners together into a candy cane shape and they turned out lovely as well. We did a few odd colors in alphabet letters to make family members a “monogram” ornament.
We haven’t attempted to look at a snowflake beneath the microscope…just assumed they would melt to fast. We do have a piece of smooth black fabric we keep in the freezer to catch snowflakes and then photograph them.
Lisa,
Thanks! You’ve got some great ideas too, thanks for sharing them.
Paige
Thanks for a great idea, Paige! I might try to do this tis week with my girls!